Make a PB and J
1 Get a good amount of peanut butter on a knife or spoon (this amount varies with your personal preference) and spread it out evenly onto 1 slice of bread.
2 Scoop some jelly onto the other slice of bread. Again, the amount is up to you, but when in doubt, use less rather than more. Jelly tends to squeeze out the edges and drip if you use too much. Make sure to spread the jelly evenly.
3 Gently press the two slices of bread together. Always put the peanut butter and jelly sides together, otherwise it will be messy (besides not sticking together).
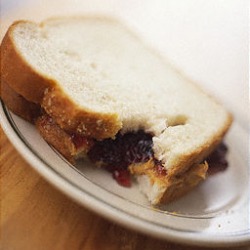
Mmmm... carbs.
Plan a Surprise Party
To plan a surprise party, you would set it up the way that you would any other party. The only difference is that you don't let the person that the party is for know that it is being planned. Have someone else ready to take them somewhere else if the party is going to be at their home. This will give you time to set up and keep them completely in the dark about what is going on.
When you have set everything up, call the person that has taken the Birthday person away. Then have everyone (including the party guests) hide around the party room, and the person that took the Birthday person away will flip on the lights. SURPRISE!!!
When you have set everything up, call the person that has taken the Birthday person away. Then have everyone (including the party guests) hide around the party room, and the person that took the Birthday person away will flip on the lights. SURPRISE!!!

Doesn't he look so surprised?
Make a paper airplane
Do a Cartwheel
1 To begin a cartwheel, stand in a lunge position with your strong leg in front, knee bent slightly and arms up by your ears.
2 If you're right-handed, reach forward with your right arm, kicking your left leg up as you do so. The left hand should follow very quickly, and as it touches the ground, your right leg should be off of the ground also.
3 You should pass through a handstand briefly. Your left leg will touch the ground first, followed by the right, which you will place in back, finishing in a lunge, just as you started, but with the opposite leg in front. If you're left handed, you'll reverse these directions.
4 A good cartwheel is all about having a good rhythm. Think about going 1,2,3,4, or "hand, hand, foot, foot". Take your time, and be careful - but don't be afraid.
5 Landing a good cartwheel requires more than just reading these directions. Make sure you practice with the help of your gymnastics or cheerleading coach or a P.E. teacher.

Hand, hand, foot, foot!
Be a Couch Potato
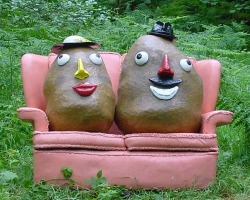
1 Sit down in a comfy place such as a reclinable chair, beanbag, or preferably, (you knew it was coming) a couch.Make it even more comfortable than it already is, but with minimal effort, of course
2 Make sure you have everything you need. Such as snacks (junk food is great for being a couch potato), drinks, magazines, comic books (if you're into that stuff), and most importantly, a television and remote(s).
3 Now just watch TV, because that's pretty much all a couch potato does! Flip through the channels. Give each show about 10 seconds to entertain you, and if it doesn't, just move onto the next one. If it does, watch until the show ends, or until you lose interest. Just make sure whatever you do, it doesn't involve getting up!
4 Another thing couch potatoes are famous for is playing video games. Go rent one that looks good or play one you already own! Please note that some Wii games involve some movement which could hinder your status as a couch potato.
Tips
After being a couch potato, be sure to jog off all that extra junk food!
Say 'Hello' in all kinds of languages
English-Hello
Spanish-Hola
French-Bonjour
German-Hallo
Albanian-Përshëndetje
Chinese-喂
Croatian- Zdravo
Czech(and Slovak)-Ahoj
Danish-Hej
Estonian-Tere
Finnish-Hei
Galacian-Ola
Hebrew-שלום
Indonesian-Halo
Irish-Dia duit
Italian-Ciao
Latvian-Sveiki
Lithuanian-Labas
Polish-Witaj
Romanian-Salut
Slovenian-Zdravo
Swahili-Hujambo
Swedish-Hej
Turkish-Merhaba
Welsh-Helo

Which 'Hello' will you memorize?
How to braid hair
1 Use the wide-tooth comb to comb out all the hair. Make sure that there are no tangles. The comb should move easily through all the hair. Make sure all hair is smooth and entirely free of even the smallest tangles.
2 Divide hair into small sections and use the fine-tooth comb to comb the sections to make sure that all the knots have been removed. Even small knots will cause problems down the road.
3 Divide the hair into three even sections. Separate the sections with your hands and make sure they don't mix together at any time.
4 Cross the left hand section over the middle section. The original left hand section is now the middle section.
Note: Still keep the sections tight by pulling them away from each other.
5 Cross the right hand section over the middle section. The original right hand section is now the middle section.
6 Continue with this process alternating left and right sections over the middle section, tightening each section as you make it. Keep repeating until you run out, with about an inch of hair left unbraided at the bottom.
Note: Now would be the time, if you choose, to put hair spray on the hair to hold it. (optional)
7 Secure the end of the braid with a ponytail holder.
Note: Add a ribbon. (optional)
Tips
*You may wish to use a hair tie to hold the section of hair you wish to braid all together. You may also spray hair spray or use gel on the section of hair before you start to enable the three parts to stay together better.
*Gentle tension on the braid, pulling down on the strands, will keep the braid snug.
*Many people find it easier to braid wet hair.
*You can also do the same process with more than two strands. Four and five strands are done almost exactly like the three strand ordinary braid.
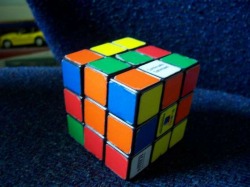
Solve a Rubix Cube
Step 1
So, what you want to do now is solve the top corners. -Pick your favorite color (I always use blue, some use white, it really doesn't matter) -Locate one of the corners -Make it so that your favorite color (we'll use blue from now on) is facing upwards and that the other two colors on the corner piece are on the side of the cube. (You can just rotate the cube so that…
step 2Solving the top edges
Okay, so you have all the corners, now you need to fill in the edges! Since the top corners are finished, it's not suggested that you move the top layer during the set-up process if this is new to you, but you CAN move it in the algorithms that I have presented to you. Simply move the middle and bottom layers to set up your target pieces The target pieces for this are… step 3Solving the top Middle Piece
Okay, so your Top (Blue) middle piece can be in one of two places: -The bottom center -The center on one side of the middle layer. If it's in the bottom center, just follow algorithm 1 from any face If it's in the center on one side of the middle layer, make the target center piece face you, then preform algorithm two. step 4Solve the Middle Layer
So now that you have the top layer done, you should be able to make a "small 'T'" on each side by simply turning the middle layer until the middle centerpiece of nColor matches up with its respective colored "side" of the top face. Now, follow these steps: 1. Once you have that, rotate the bottom layer until it makes a "larger 'T'" with the "small 'T'" 2. Look under… step 5Placing the Bottom Corners
The first thing you need to do once you finished the middle layer is flip your entire cube over. Now, examine the corners the way that they are (colors) and see if the colors of the corner pieces correlate with the edge that they are on. You might need to turn the top (used to be bottom) layer in order to line up two adjacent corners to their respective edges. If y… step 6Orienting the Bottom Corners
Okay, now that you have all the Top (Bottom) corners in place, you have to rotate them in place so that the colors match up with their respecive sides. For example, in the first picture you see that two of the corners are not green. That's because the green is on the side of the cube. We need the green to come to the top of the cube. There are three cases for this s… step 7Positioning the 4 remaining middle pieces
Okay, so now all of the corners are in the right place and orientation.You should have one side that has the right middle piece, but it doesn't have to be in the right orientation.-If you do, then look at the cube from that side (the one with the correct middle piece between the two corners) and preform one of the two algorithms.
step 8:Finishing move!
Okay, so now you have either one of two situations:- The Fish Pattern (The correctly colored top pieces make the top of the cube look like a fish-The "H"* Pattern (The correctly colored top pieces make the top of the cube look like an "H"*Note: You hold the cube so that it looks like an "I", so it should really be called the "I" Pattern.
Good luck!!! :)
Fall Asleep Easier(and faster!)

Now, this might sound simple, but there are so many easy homemade ways to fall asleep a lot faster. I've researched(yes, you read it correctly, RESEARCHED) ways to fall asleep faster. Like, lets say it's, um... Christmas Eve, or the night before an event you're super excited for. Or, a stressful day tomorrow(test, meeting, etc.) and you know you won't be able to fall asleep. Well, while you're lying awake in bed, or wondering how you'll fall asleep, think back to now, as you're reading this. Pick you're favorite way, but in my opinion, the easiest is #4.
1) Drink a cup of chamomile tea, or have a banana. They both have amino acid tryptophan, which helps you fall asleep.
2) A cold foot bath helps to switch off you're brain(not literally!)Just keep your feet in the cold water until the cold temperature becomes really uncomfortable. No, I'm not just trying to make you do things to hurt yourself. Trust me.
3) Make sure before bed you're doing something calmer and relaxing. You're obviously not going to fall asleep 10 minutes after turning off a horror movie, or skydiving.
4) If you're still lying awake for an hour, stop trying to sleep. One of the worst things you can do is concentrate on something(like sleeping), because it stimulates your brain. So recognize that you can't control when you fall asleep, and accept that lying there is the next best thing. Just sink into the covers and relax. That will be about the time you drift off.
5) Lie down, close your eyes, and focus on your breathing. You'll feel all the muscles in your body relax and your mind will quickly quiet down.
6) Get a Classical CD and leave it on that as you fall asleep. Then use any of the above to help even more.
7) Review boring things you did that day, or make up a boring play in your head. Just don't think too hard about anything.
8) Now you can...zzzzzzzzzzzzzzzzzzzzzzzzzzzzzzzzzzzzzzzzzz
Make your own Board Game
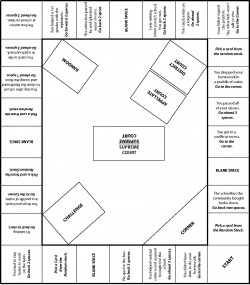
Monopoly, Clue, Chutes and Ladders, Candy Land -- how many of us have not encountered at least one of these games at some point? Indeed, whether as kids or as adults, playing with board games is a fun and enjoyable way to spend time with family and friends. For an added twist to the conventional board game titles that you've already played, why don't you try creating your own board game? Making your own doesn't require a lot of fancy materials or tedious labor -- you can just make do with materials already lying around your house. What's more, it's surely an activity that will unleash your creativity and allow you to add your personal touch to the game, making your future game nights even more fun!
But first: Things You'll Need...
A base for your board game -- cardboard, cardstock, poster board, old pizza boxes, or old boards from other games you do not use anymore*Game Pieces -- use existing pieces from your other games, or design your ownDice -- use existing dice from your other games, or create your own*Coloring materials -- markers, paints*Computer print-outs or magazine cut-outs for the design pieces*Scissors*Glue or tape
1) Determine the age limits for which you want to create a board game. Knowing the age range of your tentative players would allow you to design the game as simple or as detailed as you wish it to be, and would allow you to create age-appropriate rules. For instance, if you are designing the game for young children, you would want to create something that is simple, easy-to-understand, fun, and would promote camaraderie and learning among the children at the same time. For adults, you could create something that is more competitive and exciting -- sky's the limit!
2) Think of a theme for your game. Are you interested to create a game that is based on some skill, such as Pictionary, Scrabble or Clue? Or are you more interested to create a path game that is purely based on luck and chance, such as Chutes and Ladders? If so, will it be one where you are a pirate and must travel the seas to find lost treasure, or will you be trapped in haunted mansion and must avoid the monsters and ghosts? Use your imagination when deciding.You can even make the theme about a book! You could use ideas from existing games to help you get started.
3) Map out the rules of and directions for the game. As much as possible, try to keep the rules simple, so that new players will catch on quickly and will have a fun playing experience in general. Here are some things to keep in mind when creating the rules:
5) Create the game pieces. You can draw the images on paper, then tape or glue them to your preferred material, such as light cardboard (the type used on cereal boxes). To make the pieces stand, cut out a strip of cardboard that you can fold into a 3D triangle (similar to picture frame stands), then stick to the back of the piece for support. Another way to make game pieces that stand is to glue craft foam to the bottom of the folded piece of paper. You could also use pieces from other game sets. You can make the character pieces in line with the the place markers such as cards or tokens, draw these out as well. Good materials to use for the game cards are index cards or cardstock.
But first: Things You'll Need...
A base for your board game -- cardboard, cardstock, poster board, old pizza boxes, or old boards from other games you do not use anymore*Game Pieces -- use existing pieces from your other games, or design your ownDice -- use existing dice from your other games, or create your own*Coloring materials -- markers, paints*Computer print-outs or magazine cut-outs for the design pieces*Scissors*Glue or tape
1) Determine the age limits for which you want to create a board game. Knowing the age range of your tentative players would allow you to design the game as simple or as detailed as you wish it to be, and would allow you to create age-appropriate rules. For instance, if you are designing the game for young children, you would want to create something that is simple, easy-to-understand, fun, and would promote camaraderie and learning among the children at the same time. For adults, you could create something that is more competitive and exciting -- sky's the limit!
2) Think of a theme for your game. Are you interested to create a game that is based on some skill, such as Pictionary, Scrabble or Clue? Or are you more interested to create a path game that is purely based on luck and chance, such as Chutes and Ladders? If so, will it be one where you are a pirate and must travel the seas to find lost treasure, or will you be trapped in haunted mansion and must avoid the monsters and ghosts? Use your imagination when deciding.You can even make the theme about a book! You could use ideas from existing games to help you get started.
3) Map out the rules of and directions for the game. As much as possible, try to keep the rules simple, so that new players will catch on quickly and will have a fun playing experience in general. Here are some things to keep in mind when creating the rules:
- What is the end goal of the game?
- How would the players win?
- What is the minimum and maximum number of players that can play?
- Is the game meant purely for enjoyment purposes, educational purposes, or a mixture of both?
- What are the pieces needed for the game? (Players' markers, dice, cards, etc.)
5) Create the game pieces. You can draw the images on paper, then tape or glue them to your preferred material, such as light cardboard (the type used on cereal boxes). To make the pieces stand, cut out a strip of cardboard that you can fold into a 3D triangle (similar to picture frame stands), then stick to the back of the piece for support. Another way to make game pieces that stand is to glue craft foam to the bottom of the folded piece of paper. You could also use pieces from other game sets. You can make the character pieces in line with the the place markers such as cards or tokens, draw these out as well. Good materials to use for the game cards are index cards or cardstock.
- If your game involves the use of a dice or spinner, you can just use the ones from your existing games, or create your own from cardboard and markers.
- Print out the directions for your game as well, so that players can just refer to that in case you are not around to explain the rules.
6) Test and retest. Test your prototype design as many times as deemed reasonable with patient friends and family in order to iron out any unforeseen bugs or pitfalls. Ensure that the game rules are fair and that the game concept is fun and enjoyable to the target audience and modify the rules as accordingly. It can be a a lot of work to balance the fun factor with the challenge all while adding fairness to the equation. Once your gaming formula runs consistently smooth, you maybe ready to publish your masterpiece. At which point you will need to consult the appropriate publishers and brokers.
From WikiHow
